 |
| The finished process should look similar to this. |
You Will Need:
- A Cabochon - You can buy these at many places online or at hobby art stores. I bought the Labradorite cab I used in this project from AliveGems on Etsy.
- Epoxy or All-Purpose Glue - For attaching stone and other non-leather things to leather. I use Goop.
- Thin Leather Scraps - These should be at least a little bigger than your cabochon to be used as backing. I used thin pieces I had split off from thicker leather using a Skiver. You can purchase bags of thin scraps at Hobby Lobby as well. They will not be visible in the final design, so can be any color.
- Tanner's Bond Leathercraft Cement - For glueing leather to leather. Goop will work just as well, but in my experience this has been the best thing for leather-to-leather attachment and is not as unwieldy and...well...goopy as Goop. The fumes are not as severe either. It has a consistency more like Elmer's Glue. It's easy to apply and easy to clean up.
- Scissors - Good, sharp scissors for cutting heavy paper (or in this case felt).
- Gum Tragacanth (optional) - Used to slick edges and smooth rough surfaces in leather. It is vegetable based.
- Bone Folder or Modeling Spoon - Or even a pen cap with a rounded edge. Used for burnishing and smoothing edges of leather.
- Sponge - For dampening leather before you tool or carve it.
- Sticky-Back Felt - I bought mine at Hobby Lobby. They sell an eco-friendly sticky-back felt made from recycled bottles. You peel off the back to reveal the adhesive.
- Metallic Paint Pen - This should be the color you want your 'bezel' to be. I used DecoColor Liquid Silver for this project.
- Pencil - A plain graphite pencil for making marks on the leather. Don't worry, the marks won't be seen in the end.
- Utility Knife or Heavy Duty Xacto Blade - For cutting out the opening. Needs to be able to cut through thick leather.
Step 1 - Place Your Cab
 |
PROTIP:
I placed mine a little too low on the forehead where the mask curves in towards the bridge of the nose, which led to my cabochon bezel looking a little askew in the finished product due to the leather warping around the cabochon opening.
Do yourself a favor and place your cabochon higher on the head than I did.
Step 2 - Sizing the Cabochon Opening
 Next, trace about 1/16th of an inch in from the outside of your cab's outline. You can do this with a compass or a stencil, but I did it very carefully by hand. It doesn't need to be ultra precise, but it does need to stay true to the shape of your cabochon, which might not be perfectly round anyways.
 The opening should be slightly smaller than your cabochon so that the edges of the cab will be hidden once it is put in place beneath the leather surface so that the upper portion protrudes through the opening.
Step 3 - Cut the Cabochon Opening
 Very carefully and slowly, cut out the opening of your cabochon along the inner line you drew. Don't worry about the outer line being visible as that's going to be beveled off in a later step. Notice I miscut while I was cutting out my opening? I was able to save this mask by beveling out that mistake.
Step 4 - Bevel the Edges
 Using an Edge Beveler (I used a Sz 2), bevel off the edges on the flesh side and the rough side of the opening. This creates a rounded, more professional edge. The area of this bevel edge on the flesh side will also act as the fake bezel for the stone in the finished product.
Step 5 - Slick the Edges (Optional)
 Using Gum Tragacanth is entirely optional, as you can simply smooth an edge with a burnishing tool of some sort. I find that if you use Gum, however, that it more efficiently and permanently smooths frays and rough areas.
Take a damp sponge and dab Gum Tragacanth onto the freshly beveled edges then rub a Bone Folder or Modeling Spoon across the edge until the leather becomes slick, dark, and shiny. This helps to smooth all the frays in the leather.
PROTIP:
If you're using leather dye instead of acrylics for your color, be warned that applying gum might cause the leather to be lighter in the area where dye has been applied. Acrylics, however, seem to have no problem coating right over the top of leather slicked with gum.
Step 6 - Finish the Mask

Before you set the cab, you'll need to finish the rest of your mask. Get all of your dying, painting, and varnishing completed. Now the cab is ready to pop in the hole!
Step 7 - Attach the Cabochon
 Using a dab of Goop, glue the cabochon to the scrap of thin leather and wait a few minutes for it to set.
Step 8 - Set the Cabochon
Attach the scrap leather with the cabochon to the mask with the leather cement. Apply the glue to both surfaces then firmly press them together and hold them in place for at least a minute. You also want to press firmly on the cabochon so that it protrudes through the opening and fits snugly in it. Be careful not to force it all the way though!


Step 9 - Draw the Bezel
 Using the silver paint pen, carefully draw the bezel around the edge of your cabochon. Be sure not to get any paint on your stone! The bezel looks most convincing when it fills in the small beveled edge that surrounds your stone.
PROTIP:If you should get paint on your stone, quickly wipe it away or lightly scratch it out with the edge of your fingernail or credit card. Rubbing alcohol is a good last resort as well.
Step 10 - Making it Comfortable
 Success! The cabochon is attached! You don't want the edges of the scrap leather chaffing the wearer's forehead so I cover the area up with sticky-back felt. Just cut the size you want, peel off the sheet from the back, and stick it on the mask.
 My piece was old and had lost some of its stickiness, so I used Goop in key places to make sure it would stay.
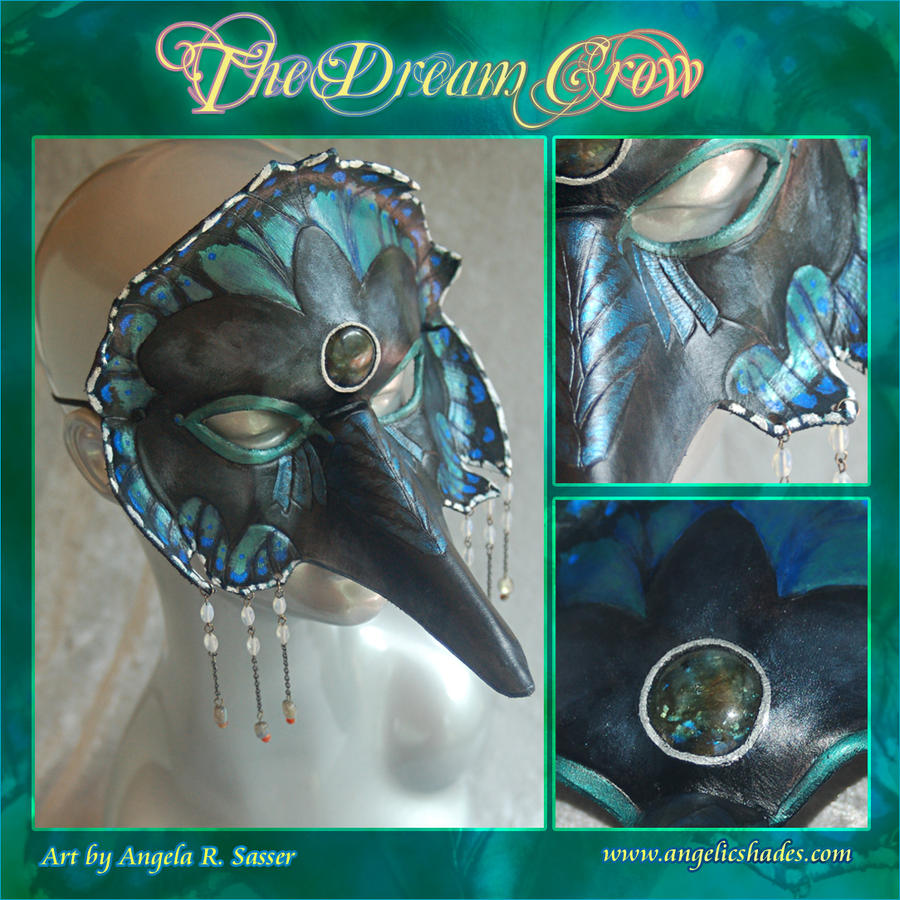
The Final Product!
 |
| My mask is a bird! Your argument is invalid! |
awesome... thank you
ReplyDelete